
 Persian
 Arabic
 Russian

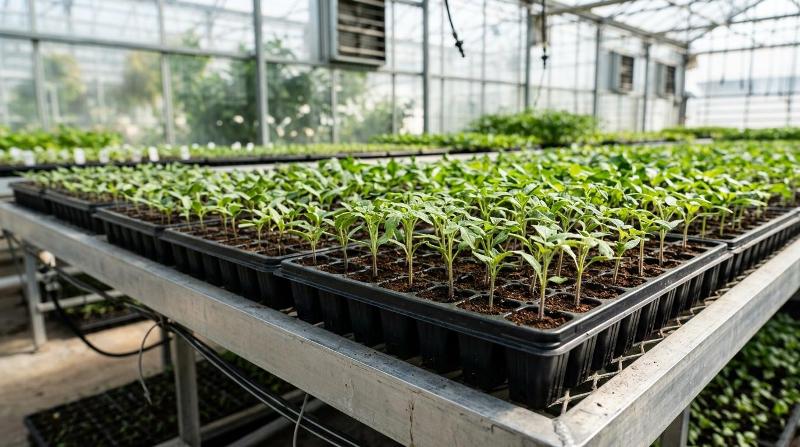
A strong crop rarely begins at transplanting. It begins much earlier—when the seed is placed into a growing medium, moisture is managed, and the young root system starts to develop.
For greenhouse growers, nurseries, and professional vegetable producers, a seed starting tray is not simply a plastic container with cells. It is part of the production system that influences germination consistency, root structure, seedling uniformity, labor efficiency, transport, and transplant performance.
The right seedling tray can help create plants that are easier to manage, more uniform at planting, and better prepared for field or greenhouse conditions. The wrong tray, however, may contribute to uneven emergence, poor drainage, root restriction, weak plugs, and unnecessary losses during transplanting.
This guide explains how to select seed starting trays based on crop type, cell count, tray material, drainage, depth, and practical nursery requirements.
Quick Answer: What Is the Best Seed Starting Tray?
The best seed starting tray depends on the crop, the planned transplant age, the growing medium, and the nursery system.
In general:
- Small-cell plug trays are suitable for crops that are transplanted young or require high-density production.
- Larger-cell trays are better for plants that need more root volume or remain in the nursery for a longer period.
- Rigid reusable plastic trays are usually preferred for commercial operations because they are stable, easy to handle, and suitable for repeated use.
- Trays with effective drainage holes are essential for reducing excess moisture around the root zone.
- Deeper cells can support stronger root development for crops with longer nursery cycles.
The objective is not to choose the tray with the highest number of cells. The objective is to match tray design with the biological and operational needs of the crop.
Why Seed Starting Trays Matter in Commercial Seedling Production
Seedling production is a controlled stage of crop establishment. During this period, plants develop their first roots, leaves, and structural strength. Small inconsistencies at this stage can become larger problems after transplanting.
A well-selected propagation tray helps growers manage several important variables:
- Root-zone volume
- Water retention and drainage
- Air movement around roots
- Plant spacing
- Uniformity of growth
- Movement and transport of seedlings
- Labor required for sowing, watering, and transplanting
- Plug stability during extraction
For example, when a tray cell is too small for the crop’s nursery duration, roots may become crowded and the seedling may lose vigor. When the cell is too large, the growing medium may remain wet for too long, especially under low light or cool conditions. This can make moisture management more difficult and increase the risk of root-related problems.
In other words, seed trays are not selected only by price or appearance. They are selected as part of a root-zone management strategy.
Types of Seed Starting Trays
Different tray designs serve different purposes. Understanding the main types helps buyers make a more precise decision.
1. Plug Trays
Plug trays are divided into multiple individual cells. Each cell holds one seed or one seedling plug.
They are widely used for:
- Tomato seedlings
- Pepper seedlings
- Cucumber seedlings
- Lettuce
- Herbs
- Flower seedlings
- Nursery propagation
- Greenhouse transplant production
The main advantage of plug trays is the separation of each plant. This allows individual root plugs to form, reduces root entanglement between plants, and makes transplanting more organized.
For commercial growers, plug trays also make it easier to count plants, monitor germination, sort weak seedlings, and prepare batches for delivery or transplanting.
2. Open Seed Trays
Open seed trays do not have separated cells. Seeds are sown into one continuous growing area.
They may be used for:
- Very small seeds
- Crops that will be pricked out and transplanted later
- Early-stage propagation
- Certain flowers, herbs, and ornamental plants
This system can be flexible, but it requires more handling later because seedlings need to be separated. For high-volume vegetable seedling production, cell trays are often more efficient.
3. Reusable Plastic Seedling Trays
Reusable plastic trays are common in professional nurseries because they offer structural strength and consistency.
Key benefits include:
- Suitable for repeated production cycles
- Stable during filling and transport
- Easy to stack and organize
- Compatible with many nursery benches and irrigation systems
- Available in a wide range of cell counts and depths
The quality of plastic matters. A tray that becomes brittle, bends during handling, or breaks during plug removal may increase operational costs over time.
For professional use, buyers should consider whether the tray can tolerate regular cleaning, movement, sunlight exposure, and repeated handling.
4. Flexible Silicone or Soft Polymer Trays
Flexible trays can make it easier to remove seedlings, especially when roots and growing media need to stay intact.
They are often useful for small nurseries, home growers, and crops where plug extraction must be gentle. However, flexibility can also reduce stability during filling, carrying, or moving large quantities of plants.
For high-volume operations, the decision should be based on workflow. Easy plug removal is valuable, but tray rigidity and handling speed also matter.
5. Biodegradable Seedling Pots and Trays
Biodegradable containers are designed to be transplanted with the seedling. They can reduce handling at transplanting, but they require careful management.
Before choosing biodegradable options, growers should evaluate:
- Water behavior of the material
- Structural stability in humid environments
- Compatibility with the crop cycle
- Storage conditions
- Cost per plant
- Performance during transport
These products can be appropriate in some systems, but they are not automatically the best choice for every nursery or greenhouse.
How to Choose the Right Cell Size
One of the most important decisions is tray cell size. Cell count, cell depth, and cell volume directly affect how long the seedling can remain in the tray and how the root system develops.
Small-Cell Trays
Small-cell trays are usually selected when:
- High plant density is required
- Seedlings will be transplanted at an early stage
- Nursery space is limited
- The crop has a short propagation cycle
- The production system requires a large number of plants
They can improve space efficiency, but they also demand accurate irrigation and nutrition management. Because root volume is limited, seedlings should not remain in undersized cells for too long.
Large-Cell Trays
Larger cells are generally more suitable when:
- Seedlings need a longer nursery period
- Crops develop more extensive roots
- Stronger plugs are needed for manual transplanting
- Irrigation intervals need to be slightly more forgiving
- Seedlings must travel longer distances before planting
Tomato, pepper, cucumber, melon, and some ornamental crops may require different cell volumes depending on the transplant schedule and local production method.
The Key Question Is Not “How Many Cells?”
A 72-cell, 104-cell, 128-cell, or 200-cell tray is not inherently good or bad. The correct choice depends on the crop and the intended transplant age.
Before ordering seed starting trays, ask:
- What crop will be grown?
- How many days will seedlings stay in the tray?
- Will seedlings be transplanted manually or mechanically?
- What growing medium will be used?
- How often can irrigation be managed?
- Will seedlings be transported after production?
- Does the nursery use ebb-and-flow, overhead irrigation, or manual watering?
These questions help prevent a common mistake: choosing a high-density tray simply because it appears more economical per plant.
Drainage Holes: A Small Detail With a Major Impact
Drainage is one of the most important features of a seed starting tray.
Young roots need moisture, but they also need oxygen. When water remains around the root zone for too long, oxygen availability can decrease. This can affect root activity and create conditions that support disease development.
A suitable seedling tray should allow excess irrigation water to leave the cell efficiently while retaining enough growing medium to support the plant.
What Good Drainage Supports
- More balanced moisture conditions
- Better air exchange in the root zone
- Reduced risk of waterlogging
- Stronger and more stable plugs
- Easier control of irrigation frequency
- Improved root-zone uniformity across the tray
Drainage must be considered together with the growing medium. A tray with excellent drainage will not fully solve problems caused by an overly compact or poorly structured substrate. Likewise, even a high-quality growing medium can perform poorly in a tray with inadequate drainage design.
For a complete propagation system, tray design, substrate structure, irrigation scheduling, and greenhouse climate should work together.
Tray Depth and Root Development
Cell depth is often overlooked, but it can affect the shape and behavior of the root plug.
A shallow tray may be sufficient for crops that are transplanted quickly. However, crops that remain longer in propagation may benefit from deeper cells that provide more vertical root space.
The appropriate depth depends on:
- Crop species
- Seedling age at transplanting
- Temperature and light conditions
- Irrigation frequency
- Growing medium structure
- Transplant method
- Desired plug strength
A deeper cell does not automatically guarantee a better seedling. If the root zone remains overly wet, deeper media volume may create additional moisture-management challenges. The goal is a balanced root environment, not simply the largest possible cell.
Choosing Seed Starting Tray Material
Tray material affects durability, cleaning, handling, and long-term operating cost.
| Feature | Rigid Plastic Trays | Flexible Trays | Biodegradable Trays |
|---|---|---|---|
| Reusability | Usually high | Often high | Generally limited |
| Handling stability | High | Moderate | Varies |
| Plug removal | Good with proper design | Often easy | Transplanted with the container |
| Commercial nursery suitability | High | Depends on workflow | Depends on crop and system |
| Cleaning and sanitation | Usually easier | Varies by design | Not generally reusable |
| Long-term cost control | Can be favorable | Depends on durability | Depends on repeat purchase needs |
For commercial buyers, the most practical calculation is not only the initial tray price. Consider:
- Expected number of production cycles
- Breakage rate
- Labor required for cleaning
- Ease of plug removal
- Compatibility with existing nursery equipment
- Cost of replacing damaged trays
- Consistency between batches
How to Use Seed Starting Trays Correctly
A quality tray performs best when it is used with a structured propagation process.
Step 1: Start With a Clean Tray
Used trays should be cleaned and sanitized according to the nursery’s hygiene protocol. Residues, algae, old growing media, and plant debris can create avoidable risks in the next production cycle.
Step 2: Select a Suitable Growing Medium
Use a propagation medium with appropriate water-holding capacity, drainage, and structure. The medium should fill the cells consistently without excessive compaction.
For many professional systems, growers use soilless propagation media such as cocopeat-based blends, perlite mixtures, peat-based substrates, or other engineered nursery substrates. The correct choice depends on crop needs and irrigation strategy.
Step 3: Fill Cells Uniformly
Uneven filling can result in different water volumes, inconsistent seed depth, and irregular emergence. Fill the tray evenly and avoid compressing the medium too aggressively.
Step 4: Sow at the Right Depth
Seed depth depends on seed size and crop requirements. Planting too deeply can delay or reduce emergence, while planting too shallowly may expose seeds to drying or movement.
Step 5: Manage Moisture Carefully
The most common issue in seedling production is not lack of water—it is inconsistent water management.
The medium should remain moist enough for germination but not saturated. Frequent overwatering can reduce oxygen in the root zone and weaken early root development.
Step 6: Provide Appropriate Light, Temperature, and Airflow
Seed trays do not operate independently from the greenhouse environment. Germination and seedling quality are affected by:
- Temperature
- Light intensity
- Photoperiod
- Relative humidity
- Air circulation
- Fertilizer program
- Irrigation timing
A humidity dome may be useful during early germination for certain crops, but it should be managed carefully. Once seedlings emerge, excessive humidity and poor airflow can increase disease pressure.
Common Seedling Tray Problems and What They Usually Mean
Problem: Seedlings Are Tall, Weak, and Leaning
This is often described as “leggy” growth. Common causes include insufficient light, excessive plant density, high temperature, or poor airflow.
Practical response: Review lighting, spacing, temperature, and ventilation—not only the tray itself.
Problem: Uneven Germination Across the Tray
Possible causes include uneven seed quality, inconsistent sowing depth, irregular moisture, poor tray filling, or temperature variation.
Practical response: Check whether all cells were filled equally and whether irrigation reaches the entire tray uniformly.
Problem: Roots Are Circling or Becoming Too Dense
This may indicate that the seedling has remained too long in the tray or that the cell volume is too small for the crop cycle.
Practical response: Adjust transplant timing or select a tray with a more suitable cell size for the next production batch.
Problem: Seedlings Are Difficult to Remove
This can result from poor tray design, weak root development, excessively dry growing medium, or roots not having formed a stable plug.
Practical response: Evaluate both tray shape and substrate management. Plug extraction is influenced by the entire propagation process.
Problem: Mold or Algae Appears on the Growing Medium
This often indicates excess moisture, weak airflow, poor drainage, or sanitation issues.
Practical response: Improve irrigation discipline, increase ventilation where appropriate, and clean trays between production cycles.
Seed Starting Trays for Different Crops
Tomato and Pepper Seedlings
Tomato and pepper growers often need trays that support uniform plugs and stable root systems, especially when seedlings will be transplanted into greenhouse soil, grow bags, cocopeat slabs, or hydroponic systems.
Cell selection should reflect the planned transplant age and the nursery schedule.
Cucumber, Melon, and Watermelon Seedlings
Cucurbit crops can grow quickly and may require careful timing. If they remain too long in small cells, transplant quality may decline. Larger cells may be more suitable when a longer nursery period is expected.
Lettuce and Leafy Greens
These crops are often produced in higher-density systems. Small-cell trays may be appropriate when seedlings are transplanted at a young stage and production cycles are tightly managed.
Herbs and Flowers
Herbs and ornamental plants vary widely. Some require small cells and early transplanting, while others need more root volume. Tray selection should be crop-specific rather than based on a single standard.
A Buyer’s Checklist for Seed Starting Trays
Before purchasing seedling trays, review the following points:
- Is the tray designed for the intended crop?
- What is the cell count and approximate cell volume?
- Is the cell depth appropriate for the nursery period?
- Does the tray have effective drainage holes?
- Is the material durable enough for repeated handling?
- Can the tray be cleaned and sanitized easily?
- Are the trays stable during filling, transport, and transplanting?
- Is plug removal practical for your labor system?
- Is the tray compatible with your benches, racks, irrigation, and transport boxes?
- Can the supplier provide consistent specifications across future orders?
A tray purchase should support repeatable production—not solve only one short-term planting cycle.
Seed Starting Trays and the Complete Propagation System
The tray is one component of a broader propagation system. To produce consistent seedlings, growers should align the tray with:
- Suitable seed quality
- A reliable growing medium
- Controlled irrigation
- Proper nutrition
- Greenhouse climate management
- Hygiene and sanitation procedures
- Transplant scheduling
- Skilled nursery labor
This systems-based view is especially important for commercial greenhouse operations. A low-cost tray may become expensive if it creates breakage, poor plug release, uneven seedlings, or extra labor during transplanting.
The best purchasing decision is therefore based on total operational value—not only the unit price.
Choosing Seed Starting Trays for Your Operation
Whether you operate a commercial greenhouse, a vegetable nursery, an agricultural supply business, or a small propagation unit, selecting the right seed starting tray starts with understanding your crop cycle.
Consider the crop, the transplant age, the required plant density, irrigation method, substrate, and expected handling conditions. With these factors clear, tray selection becomes more accurate and production planning becomes easier.
Mayadasht can help agricultural buyers and growers evaluate the right propagation tray options based on their crop type, production scale, and operational requirements.
Contact our team to discuss seed starting trays, nursery supplies, and suitable propagation solutions for your growing system.
FAQ Section
1. What is the best seed starting tray for vegetables?
The best tray depends on the vegetable crop and transplant schedule. Tomatoes, peppers, cucumbers, lettuce, and herbs may require different cell sizes, depths, and tray designs.
2. Are plastic seedling trays reusable?
Many plastic seedling trays are reusable if they are made from durable material and cleaned properly between production cycles. Their useful life depends on material quality, handling, sunlight exposure, and sanitation practices.
3. How many cells should a seedling tray have?
There is no single ideal cell count. A higher cell count is suitable for high-density, short-cycle production, while lower cell counts with larger cells are more suitable for crops requiring additional root volume.
4. Why are drainage holes important in seed starting trays?
Drainage holes remove excess water and help maintain oxygen around the roots. Good drainage supports healthier root development and reduces the risk of overly wet growing conditions.
5. Can I use cocopeat in seed starting trays?
Yes. Cocopeat and cocopeat-based propagation mixes can be used in seedling trays when their moisture behavior, EC level, buffering status, and structure are suitable for the crop and irrigation system.
6. What causes seedlings to become weak in a tray?
Weak seedlings may result from inadequate light, overwatering, poor airflow, excessive density, unsuitable temperature, weak nutrition management, or keeping plants in undersized cells for too long.